











WordPress has two mainstream post editors: the "Gutenberg Editor" (default) and the "Classic Editor". Both have their own characteristics and are suitable for different usage scenarios. This chapter will compare the differences between the two, interface features and application, to help you quickly get started with the editing tool that suits you.
I. Recognizing two editors: the core difference
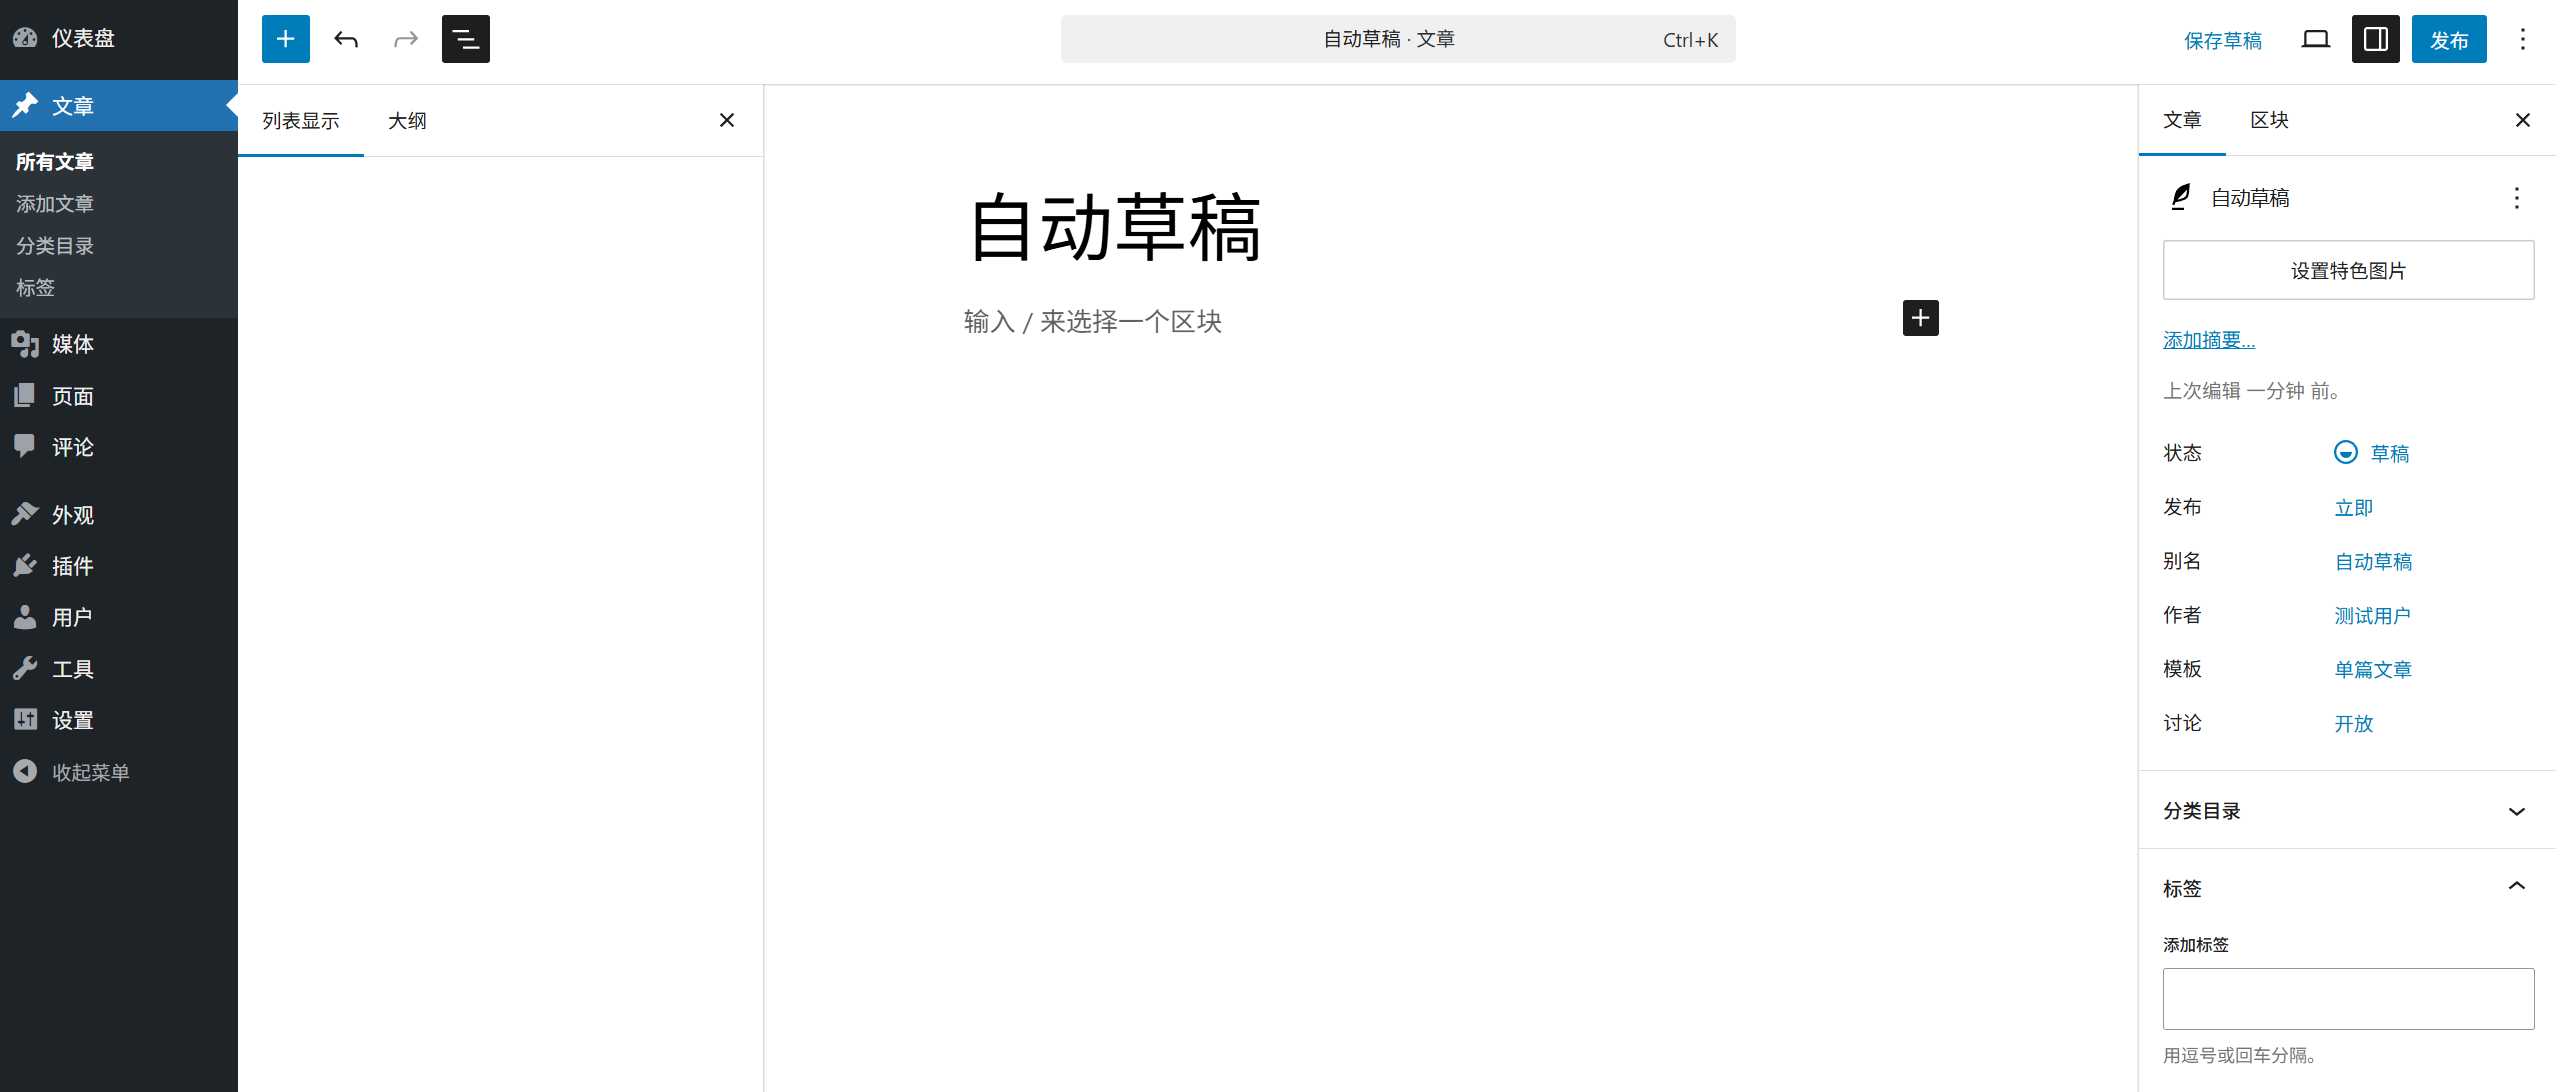
- Gutenberg Editor (Gutenberg)2018 WordPress 5.0 launched a new generation of editors, the use of "block (Block)" type editing mode, each content element (text, images, video, etc.) are independent "block", can be freely combined and adjusted. Features: strong visualization, flexible layout, support for complex typography, suitable for the pursuit of design-oriented content.
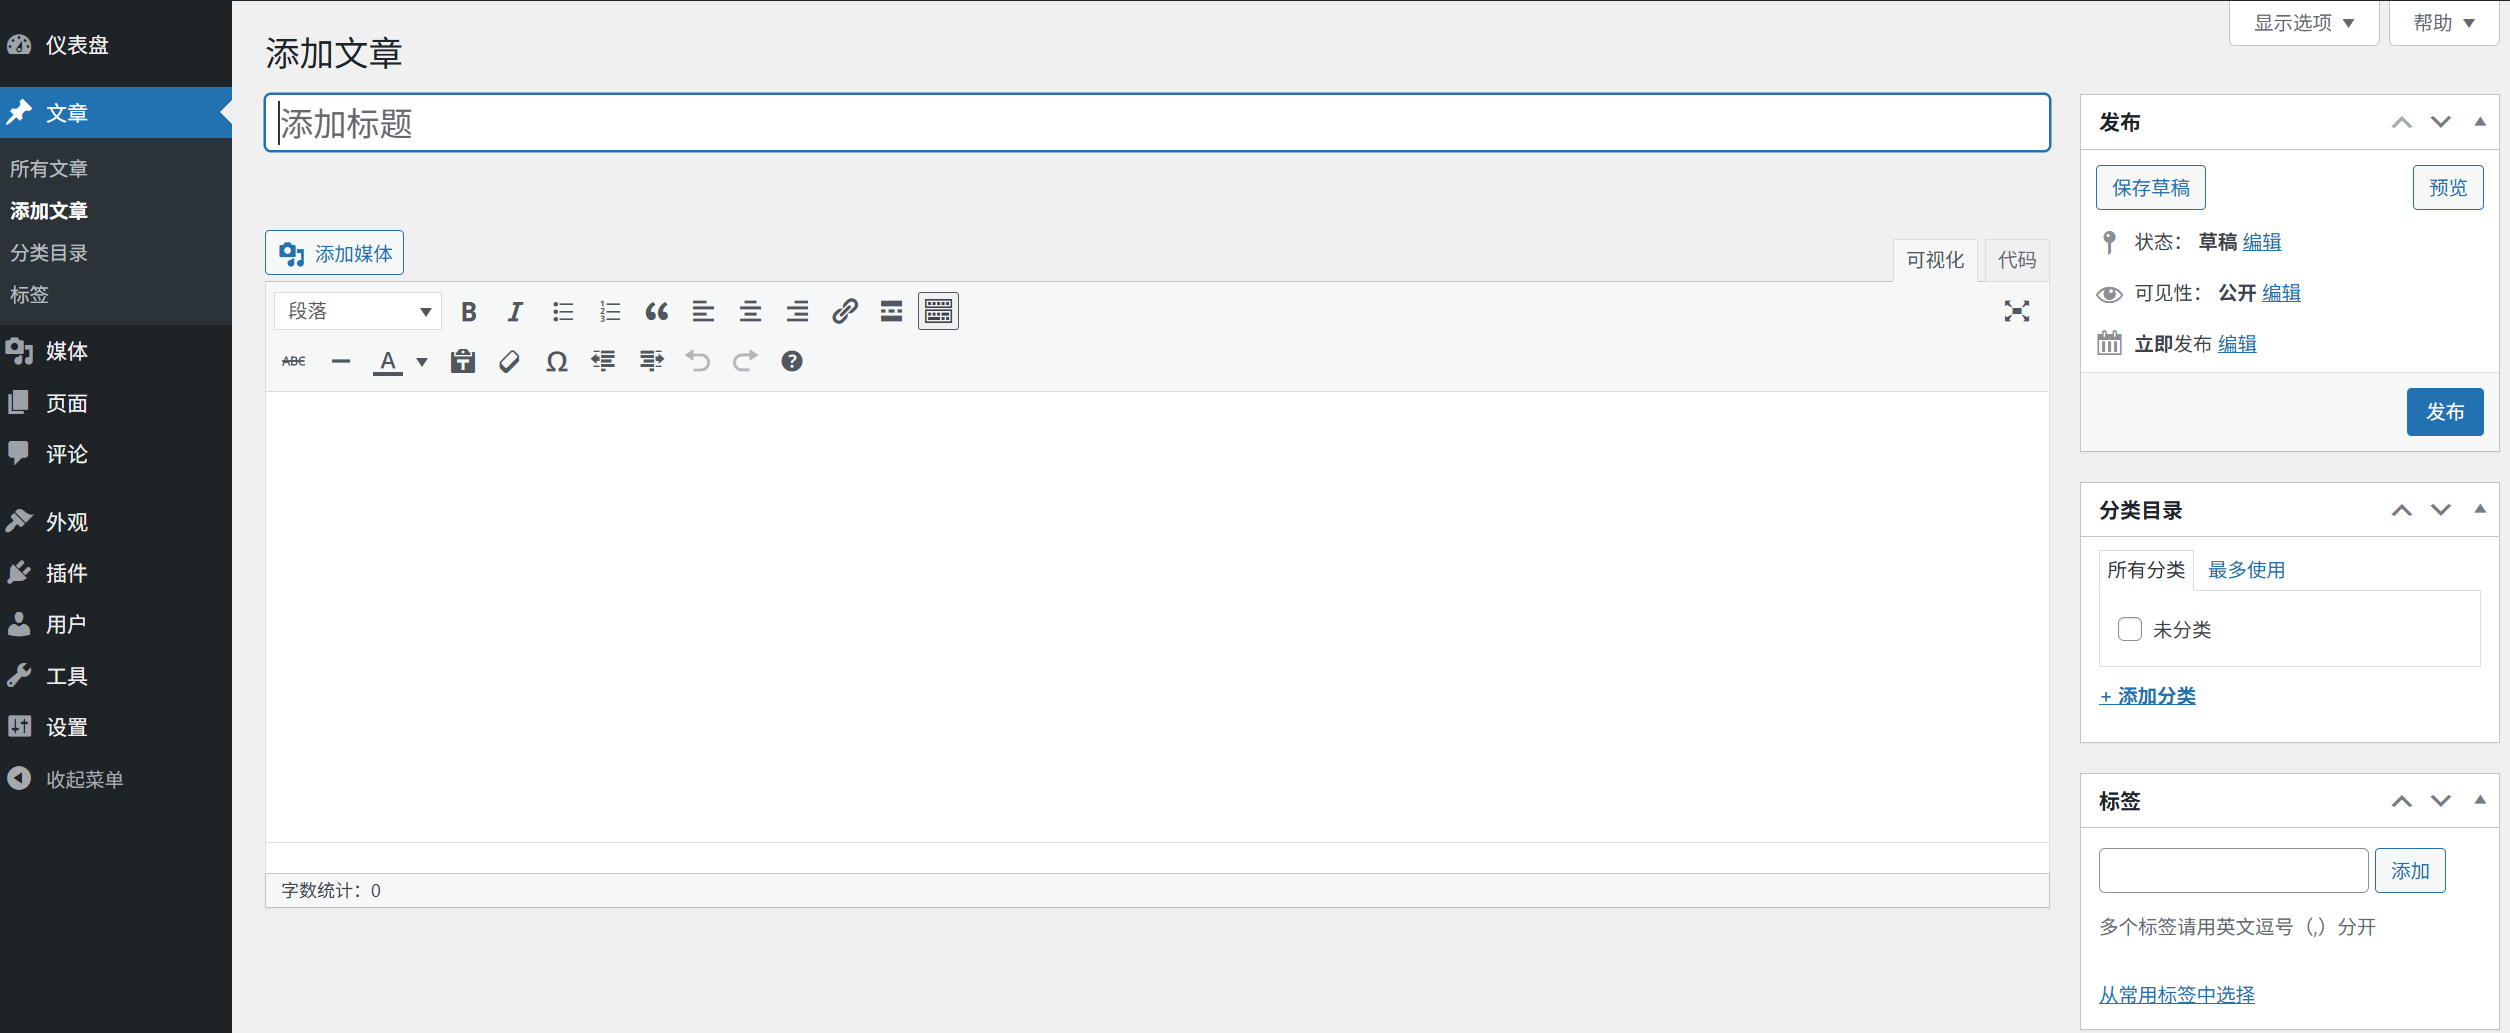
- Classic EditorTraditional rich text editor, similar to the Word document editing mode, through the toolbar buttons to operate the format, all content in an edit box to complete. Features: simple operation, low learning costs, suitable for pure text content or users accustomed to traditional editing methods.
Second, the Gutenberg editor: block mode details (recommended for novices to learn)
Gutenberg is the official WordPress main editor, more powerful, the following is the core interface and operation:
1. Interface composition (top to bottom)
- title bar (of a window) (computing): Displays the "Add Title" input box (article title is required and affects SEO and links).
- block editorial block: In the body content area, the "Start writing or type / to add a block" prompt text is displayed by default.
- Right Settings Panel: It is divided into two tabs, "Document" and "Block":
- "Document": Set article status (draft/published), category, tags, featured image, etc.
- "Block": when a block is selected, the detailed settings (e.g. text size, color, alignment) of the block are displayed.
- Top ToolbarThe "Save," "Preview," and "Publish" buttons are included, as well as Undo/Redo, Settings, and other functions.
2. Core functionality: use of blocks
At the heart of Gutenberg are 'blocks', through which all content is added and edited:
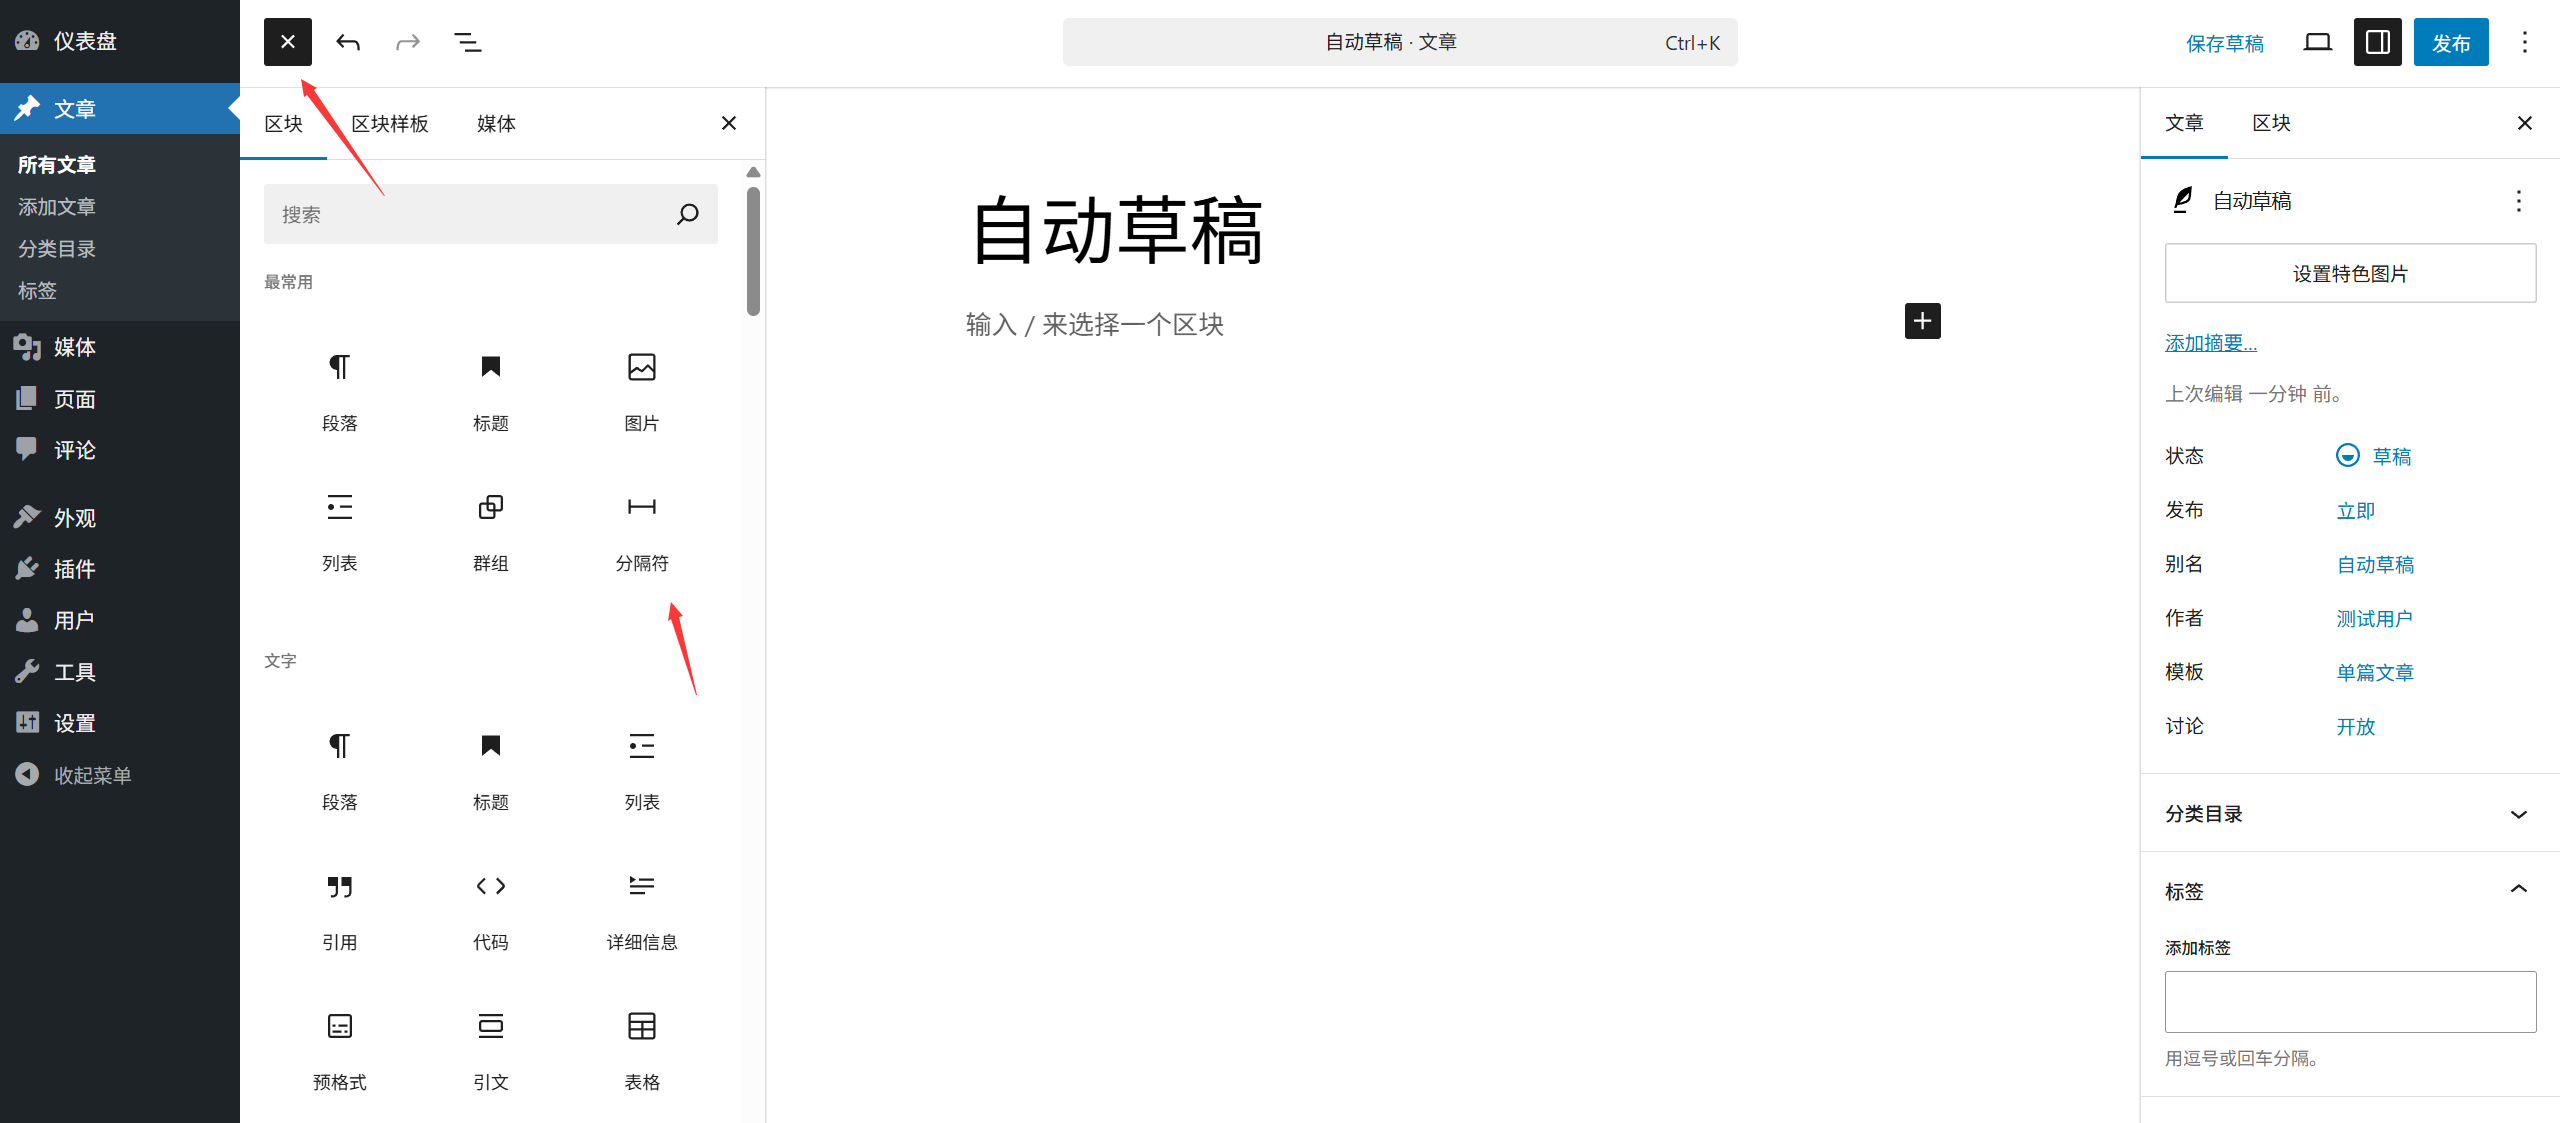
(1) 3 ways to add blocks
- Method 1: Click on the "+" icon (block inserter) in the editing area and select the desired block (e.g. "Paragraph" "Picture" "Title") from the list.
- Method 2: Type directly in the edit area
/If you want to search for a block, enter a keyword (e.g. "image", "button") to quickly find the corresponding block. - Method 3: Paste content directly (e.g. copy images, tables) and Gutenberg will automatically recognize and create the corresponding blocks.
(2) Commonly used blocks and applications
- passages: The most basic text block, used for body text content (just enter the text directly after the default).
- caption: Used to set subheadings (H2-H6) to divide the structure of the article (you can switch the level of headings on the right side after selecting the block).
- photograph: Insert images (supports uploading local images or selecting media library images, alignment and size can be set).
- listings: There are "bulleted lists" (unordered) and "numbered lists" (ordered), which are suitable for step-by-step explanations or bullet-point lists.
- quote: Highlight quotes or famous people (a citation style is automatically added to distinguish it from the text).
- buttons: Add clickable buttons (can set link, color, size, suitable for guided jumps).
(3) Basic operation of blocks
- selected block: Click on the block to select it (a blue border and toolbar will appear around the edges).
- moving block: Drag the "up and down arrows" icon in the block toolbar, or use the keyboard shortcut (↑↓ arrows) to adjust the position.
- Copy/Delete Block: After selecting a block, click the "Copy" or "Delete" icon in the toolbar, or right-click the block to select an action.
- Merge / Split Blocks: After selecting a block of text, you can merge it by using the "Merge" icon in the toolbar, or by pressing the
EnterKey Split.
3. Strengths and scenarios
- dominance: Visual typography, support for complex layouts (e.g. multiple columns, cards, media and text combinations), block reusability, compatibility with most modern themes.
- Scenario: Articles that require rich typography (e.g. tutorials, reviews), content that includes images/videos, and users who are looking for page aesthetics.
III. Classic Editor: Traditional Editing Modes in Detail
The Classic Editor was the default editor in the early days of WordPress, and is much simpler and more straightforward to use:
1. Interface components
- editorial district: A single text input box where everything is edited (similar to a Word document).
- toolbar (in computer software): There are two modes: "Visual" and "Text":
- "Visualization": Display button icons (e.g. Bold, Italic, Align, Insert Image), what you see is what you get.
- "Text": display HTML code (suitable for users who know code to adjust the format manually).
- Right side panel: Similar to Gutenberg, contains settings for post status, categories, tags, etc. (some themes may simplify the display).
2. Core functionality: toolbar operations
The Classic Editor accomplishes most of its operations with toolbar buttons for commonly used functions:
- text format: bold (
B), italicized (I), underlining (U), strikethrough (ABC(with horizontal lines). - Paragraph formatting: alignment (left, center, right), list (ordered/unordered), references (
""(icon). - Insertion Functions: pictures (camera icon), media gallery (photo gallery), links (chain icon), tables, special characters.
- Style Settings: Select "Paragraph", "Heading H2-H6", etc. from the "Format" drop-down menu to divide the content hierarchy.
3. Strengths and scenarios
- dominance: Easy to operate, low learning cost, simple interface, suitable for pure text rapid editing.
- Scenario: Plain text blogs, short articles, users accustomed to traditional document editing, and content with low typographical requirements.
IV. How to switch editors? (Select as required)
1. Temporary use of the Classic Editor
If the default is Gutenberg and you want to temporarily write a certain article in the classic editor:
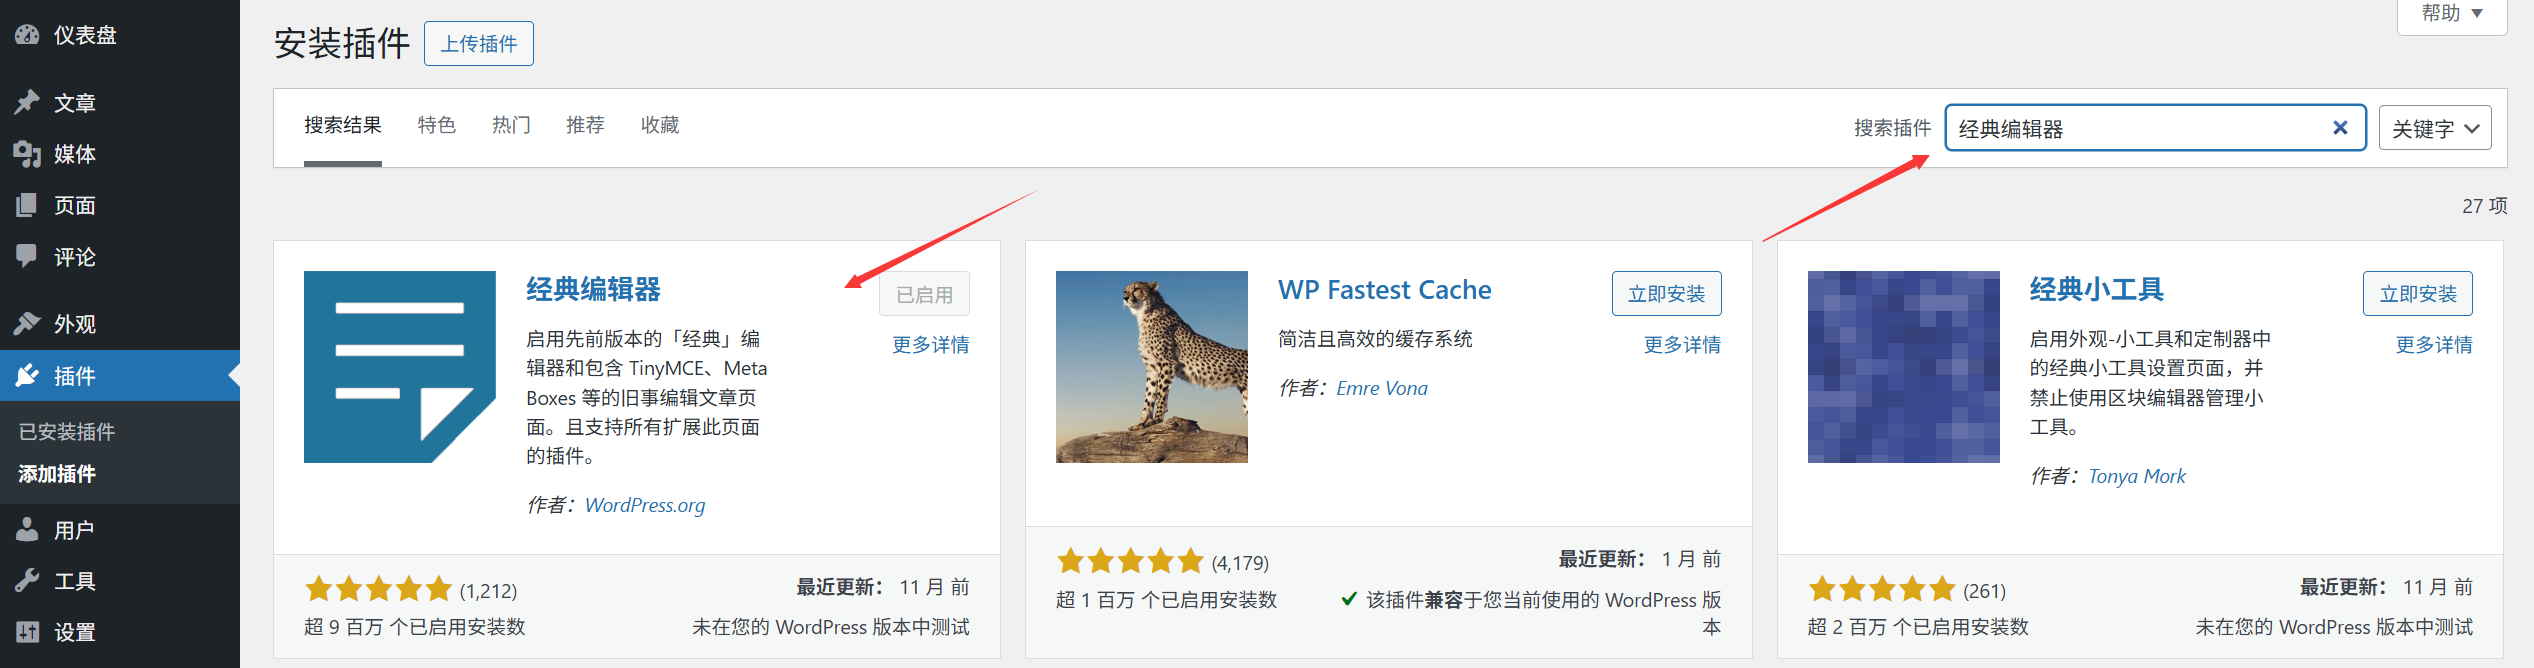
- Install and activate the plugin "Classic Editor" (official WordPress plugin, search for Classic Editor to install).
- When you create a new article, find the "Editor" option in the "Document" panel on the right and select "Classic Editor".
2. Permanent switch to classic editor
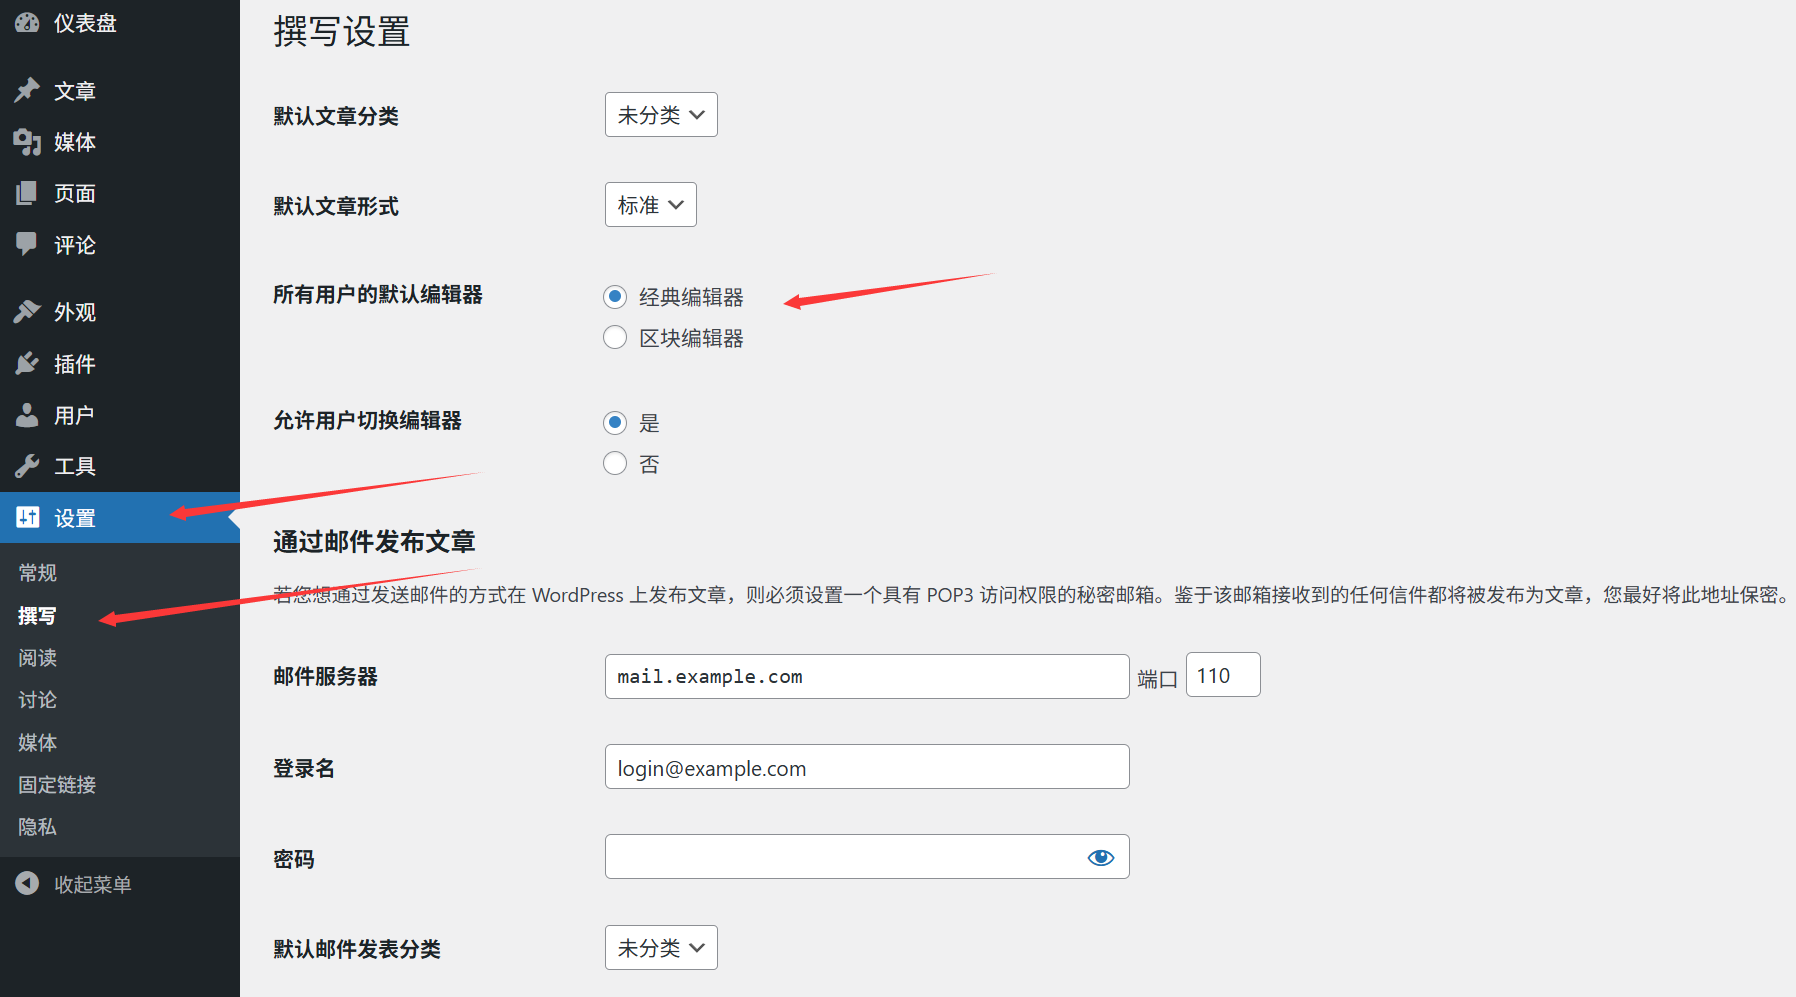
- After installing the "Classic Editor" plugin, go to "Settings" → "Writing" in the WordPress backend.
- Select "Classic Editor" from "Default Editor" and click "Save Changes".
- All new articles thereafter will use the classic editor by default.
V. Suggestions for Novice Selection
- Priority Learning Gutenberg: As the official main editor, it will continue to be updated in the future with more powerful features for long-term use (you may find it complicated at the initial stage, but it will be very efficient after you familiarize yourself with the logic of "blocks").
- Classic editor for short-term use: If there is an urgent need to publish articles quickly and the content is text-based, you can transition to the classic editor first (but it is recommended to gradually adapt to Gutenberg).
- tip: A text box similar to the Classic Editor can be inserted in Gutenberg via "Add Block" → "Classic" → "Classic Paragraph", taking into account the advantages of both modes.
Summary: Core Differences Comparison Table
| functionality | Gutenberg Editor | Classic Editor |
|---|---|---|
| Edit Mode | Block mode (each element independent) | Integral edit box (similar to Word) |
| Typographic flexibility | High (supports complex layouts such as multiple columns and cards) | Low (text-based, simple style) |
| Learning costs | Slightly higher (need to understand the concept of 'block') | Low (intuitive and easy to use) |
| Suitable for content types | Mixed-text, tutorials, complex layout articles | Plain text, short posts, simple blogs |
| Future Compatibility | Officially promoted and continuously updated | Dependent on plug-in support, functionality is no longer extended |
Regardless of which editor you choose, the core goal is to create content efficiently. We recommend spending 10 minutes actually working on two articles to get a feel for the differences, and then deciding based on your own usage habits -- once you're proficient, both tools can help you publish quality content quickly.
 English